Next.js 14 Server Actions Tutorial

Dan Tulpa
Next 14 Server Actions Tutorial
In today’s article, we’re diving into the world of Next.js server actions to create a practical Todo application. Focusing on essential development practices, we’ll navigate through using the fetch() function, creating routes, and utilizing server actions in both Server and Client components.
By the end of this walkthrough, you’ll gain proficiency in server-side operations and client-side interactivity with Next.js, empowering you to build and manage dynamic web applications. Lets get started!
Getting Started
To create a Next.js app, open your terminal, cd into the directory you’d like to create the app in, and run the following command:
npx create-next-app@latest todo-app --example "https://github.com/dtulpa16/nextjs-todo-app"
Navigating the project
The codebase for this tutorial largely comes pre-written, simulating a real-world scenario where you often engage with established code. This setup is designed to direct your attention to mastering Server Actions, rather than building everything from scratch.
After installation, open the project in your code editor and navigate to nextjs-todo-app.
cd todo-app
Folder structure
You’ll notice that the project has the following folder structure:
 app/
    ├── actions.ts
    ├── lib/
    │   └── types.ts
    ├── api/
    │   └── todos
    │       └── route.ts
    ├── components/
    │   ├── TodoFormCS.tsx
    │   ├── TodoFormSS.tsx
    │   └── TodoList.tsx
    ├── page.tsx
    └── layout.tsx
 public/
     └── data.json
/app : Contains all the routes, components, and logic for your application, this is where you'll be mostly working from.
/app/actions.ts : Contains a server action to handle adding a new To-do to our mock database - more on this later!
/app/components : Contains all components we’ll be using to craft our UI
/app/api/todos/route.ts : Contains our API logic used to fetch the To-dos from our mock database
/public/data.json : Contains our To-Do data - will serve as our mock database.
Fetch API Data
We’ll be using our Next.js app as an API to fetch our To-Dos from our data.json file. Lets make fetch request to GET these To-Dos.
Task 1 - Finish the fetch() request in the app/components/ToDoList.tsx to send a GET request to our local API and fetch our To-Dos
// app/components/ToDoList.tsx
const todos = await fetch("http://localhost:3000/api/todos", {
     next: { tags: ["ToDo"] }
});
Notice we’re giving this fetch() request a tag - “ToDo”. We’ll be utilizing this tag later when we want to refetch our To-Dos after posting a new one to our database.
Your TodoList.tsx should now look like this:
 //app/components/ToDoList.tsx
 import React from "react";
 import { toDo } from "../lib/types";

 export default async function ToDoList() {
   // Fetch To-Dos from our route handler
   const todos = await fetch("http://localhost:3000/todos/api", {
     next: { tags: ["ToDo"] },
   });

   // Parse response to JSON
   const { data } = await todos.json();

   return (
     <div className="max-w-xl mx-auto pt-10">
       <h1 className="text-4xl font-bold mb-5">To-Do List</h1>
       <ul>
         {data.map((todo: toDo) => (
           <li
             key={todo.id}
             className="bg-gray-800 p-4 rounded-lg mb-2 flex justify-between"
           >
             <div>{todo.task}</div>
             <div className="bg-blue-600 px-2 py-1 rounded text-sm">
               {todo.dueDate}
             </div>
           </li>
         ))}
       </ul>
     </div>
   );
 }
We want this list to render on our Homepage
Task 2 - Render this component in the app/page.tsx
 //app/page.tsx
 import ToDoList from './components/TodoList'

 export default function Home() {
   return (
     <main>
       <ToDoList/>
     </main>
   )
 }
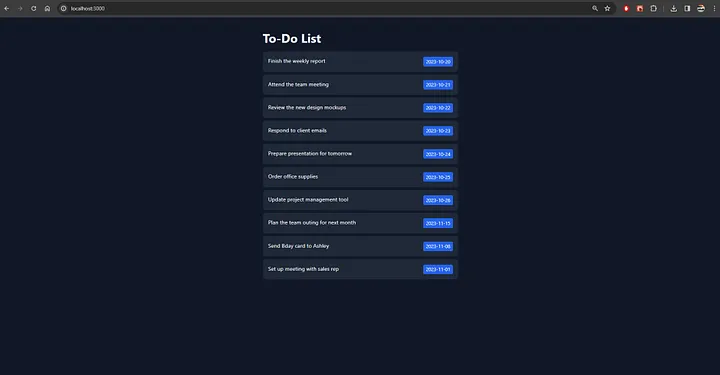
Task 3 - Run npm run dev then navigate to http://localhost:3000 to see the list of To-dos fetched from our API — A Next.js Route Handler

Side quest — modify the styles of the due date
In ToDoList.tsx :
Change <div className="bg-blue-600 ..."> to <div className="bg-green-500 ...">
Modify the text color by adding text-gray-900 to the same <div> tag
Adding our To-Do Form
Lets now get into using server actions to POST a new To-Do to our database!
Task 4 - Navigate to ToDoFormSS.tsx component, and you'll see that the form :
- Has two <input> elements for the task with name="task" and the due date name=”dueDate”
- Has one button with type="submit".
Task 5 - Create a folder named todo, nest a folder inside of that folder and call it create, then add a page.tsx to the create folder
└── app/
     └── todo/
           └── create/
               └── page.tsx
This will create a new segment we can navigate to in our browser — http://localhost:3000/todo/create
Lets get some UI in our new route
Task 6 - Back in app/todo/create/page.tsx, render in the ToDoFormSS.tsx :
 //app/todo/create/page.tsx
 import TodoFormSS from '@/app/components/TodoFormSS'

 export default function ToDoFormPage() {
   return (
     <TodoFormSS/>
   )
 }
Routing to our To-Do Form
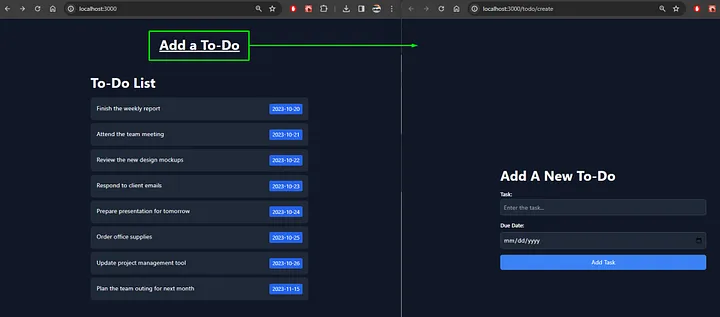
Currently, the only way to view the UI for our To-Do form is to manually navigate to todo/create/ in our browser. Lets change that by adding a link on our Home Page that will route us to our new page
Task 7 - Add a navigation link to the app/page.tsx that will route us to our new page :
 //app/page.tsx

 import Link from "next/link";
 import ToDoList from "./components/TodoList";

 export default function Home() {
   return (
     <main className="">
       {/* Add A Link tag */}
       <Link
         href="/todo/create"
         className="block mx-auto text-4xl font-bold mb-5 w-1/2 text-center pt-12 px-4 underline"
       >
         Add a To-Do
       </Link>
       <ToDoList/>
     </main>
   );
 }
Task 8 - Save all, then navigate back to http://localhost:3000 in your browser and click on the link to be routed to the To-Do Form

Adding a Server Action — Post a To-Do
Now that we have our form created, lets add in our first server action to handle a user submitting a new To-Do
Within ToDoFormSS.tsx, there's a function named addTodo() that acts as our server-side hero. It's tagged with "use server" to ensure it doesn't run client-side, keeping our operations secure and efficient:
 // app/components/ToDoFormSS.tsx

 const addTodo = async (data: FormData) => {
     "use server";
   //...
 }
- We extract the input values directly from the form data:
 const task = data.get("task")?.toString();
 const dueDate = data.get("dueDate")?.toString();
- With these values, we craft a new object to represent our to-do and shoot it over to our API using a POST request:
 const newTodoBody = {
       task: task,
       dueDate: dueDate,
     };
 // Post new Todo to our mock database
 await axios.post("http://localhost:3000/api/todos/", newTodoBody);
- After the new to-do is dispatched to our mock database, we use
revalidateTag("ToDo")to fetch the updated catalog, including the new entry. Then, we navigate back to the home page
 // Refetch Todo's
 revalidateTag("ToDo");
 // Redirect them back to the Homepage
 redirect("/");
✍️ _Under the hood, we are using the FormData API here. This is a native browser API that allows the usage of forms to mutate data without the use of JavaScript. I highly recommend taking a look at the wealth of information available in the MDN docs!
All that’s left is to tie the addTodo action to our form.
Task 9 - Add an action attribute pointing to addTodo, and you're all set!
 <form action={addTodo} className="space-y-4">
   {/* form fields */}
 </form>
Congratulations! You’ve successfully implemented your first Server Action. Here’s what you should expect if everything is working correctly:
- You should be redirected to the / route on submission.
- You should see the new To-do at the bottom of the list.
Refactor — Extracting a Server Action 🛠️
To simplify the TodoFormSS.tsx component, let's organize our code and move the server action to a separate file.
In the actions.ts file, you will find the same server action used in our TodoFormSS.tsx component. We will be updating the <form> in app/components/TodoFormSS.tsx to use this extracted function instead of declaring it directly in the component.
Task 10 - Navigate to app/actions.ts. Notice here the file is tagged with 'use server' at the very top level
💡 By adding the 'use server', you mark all the exported functions within the file as server functions. These server functions can then be imported into Client and Server components, making them extremely versatile.
 // app/actions.ts
 "use server";
 import axios from "axios";
 import { revalidateTag } from "next/cache";
 import { redirect } from "next/navigation";

 export const addTodo = async (data: FormData) => {
   // Logic to mutate form data...
   const task = data.get("task")?.toString();
   const dueDate = data.get("dueDate")?.toString();
   const newTodoBody = {
     task: task,
     dueDate: dueDate,
   };
   // Post new Todo to our mock database
   await axios.post("http://localhost:3000/api/todos", newTodoBody);
   // Refetch Todo's
   revalidateTag("ToDo");
   // Redirect them back to the Homepage
   redirect("/");
 };
Task 11 - Remove the addTodo() function from the app/components/TodoFormSS.tsx
The next step will clear the error you get after deleting this.
Task 12 - Import the addTodo() from the actions.ts file into the app/components/TodoFormSS.tsx component.
Your TodoFormSS.tsx should now look like this :
 // app/components/TodoFormSS.tsx
 import { addTodo } from "../actions"; // Importing the addTodo function

 export default function TodoFormSS() {
   return (
     <div className="flex justify-center items-center h-screen bg-gray-900">
       <div className="max-w-xl mx-auto px-4 w-full">
         <h1 className="text-4xl font-bold mb-5">Add A New To-Do</h1>
         {/* Invoke the action using the "action" attribute */}
         <form action={addTodo} className="space-y-4">
           {/* Inputs & Button */}
          </form>
       </div>
     </div>
   );
 }
Task 13 - Test by adding a new To-do!
Server Actions In Client Components
In a dynamic application, it’s common to combine server-side operations with client-side functionality such as state management and navigation.
To facilitate this within our Next.js application, we can import server-side functions into client components, maintaining a clean separation of concerns.
Task 14 - We are now going to be rendering in our ToDoFormCS.tsx component inside of our app/todo/create/page.tsx
Navigate to the TodoFormCS.tsx component, and you'll see:
- “use client” at the very top — marking this as a Client component
- Our addTodo function being imported
- Two state variables — task & dueDate
- A handleSubmit function
- A <form> with an action attribute set equal to the handleSubmit
- 2 <input> tags with onChange events that capture the user’s input in our state variables
We’re going to be replacing the Server-side To-do Form in our todo/create/ route with this client-side To-do Form
Task 15 - In app/todo/create/page.tsx, replace <ToDoFormSS/> with <ToDoFormCS/> :
//app/todo/create/page.tsx
import TodoFormCS from '@/app/components/TodoFormCS'

 export default function ToDoFormPage() {
   return (
     <TodoFormCS/>
   )
 }
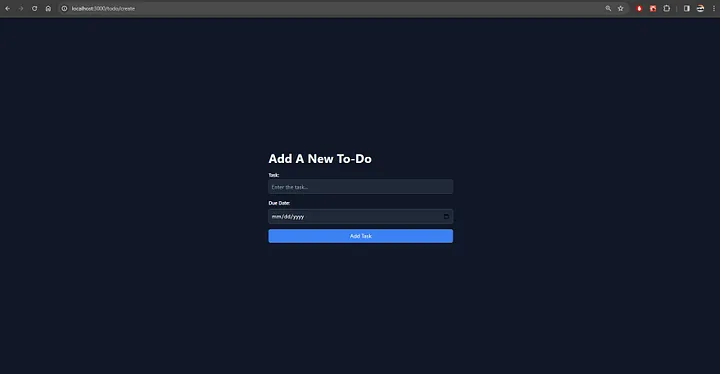
Task 16 - Navigate to the http://localhost:3000/todo/create in your browser and you should see the same UI being rendered

Our Client side “Create Page” that utilizes Server Actions for handling POSTing data
Back in your TodoFormCS.tsx component — in the handleSubmit(), you’ll see:
-
A new FormData instance being created key/values being added/appended to the form data instance
-
The addTodo() server action being called with the form data being passed in.
 const handleSubmit = (event: any) => {
     const formData = new FormData()

     formData.append("task", task)
     formData.append("dueDate", dueDate)

     addTodo(formData)
   };
In this function, we are replicating what happened in our server component when we submitted the form.
Our server function is expecting a FormData instance with values (our inputs) being a part of the form data.
Task 17 - Test it out by adding a new To-do, if everything is working correctly :
- You should be redirected to the / route on submission.
- You should see the new To-do at the bottom of the list.
Congrats! You’ve just implemented a server action in both a Server and Client side component!
Conclusion
Server Functions are functions that run on the server but can be called from the client, enhancing Next.js’s server-side abilities.
Server Actions are like Server Functions, but they’re activated by specific actions. By connecting with form elements, particularly via the action prop, they keep forms interactive even before client-side JavaScript is loaded. This means users can submit forms smoothly without waiting for React hydration.
That's a wrap for this tutorial! Thanks for sticking around. Hope you all learned something!
Keep hacking,
Dan
Share